Car Paint Correction: Top Guide to Fix Swirl Marks and Use a Correction Paint Pen
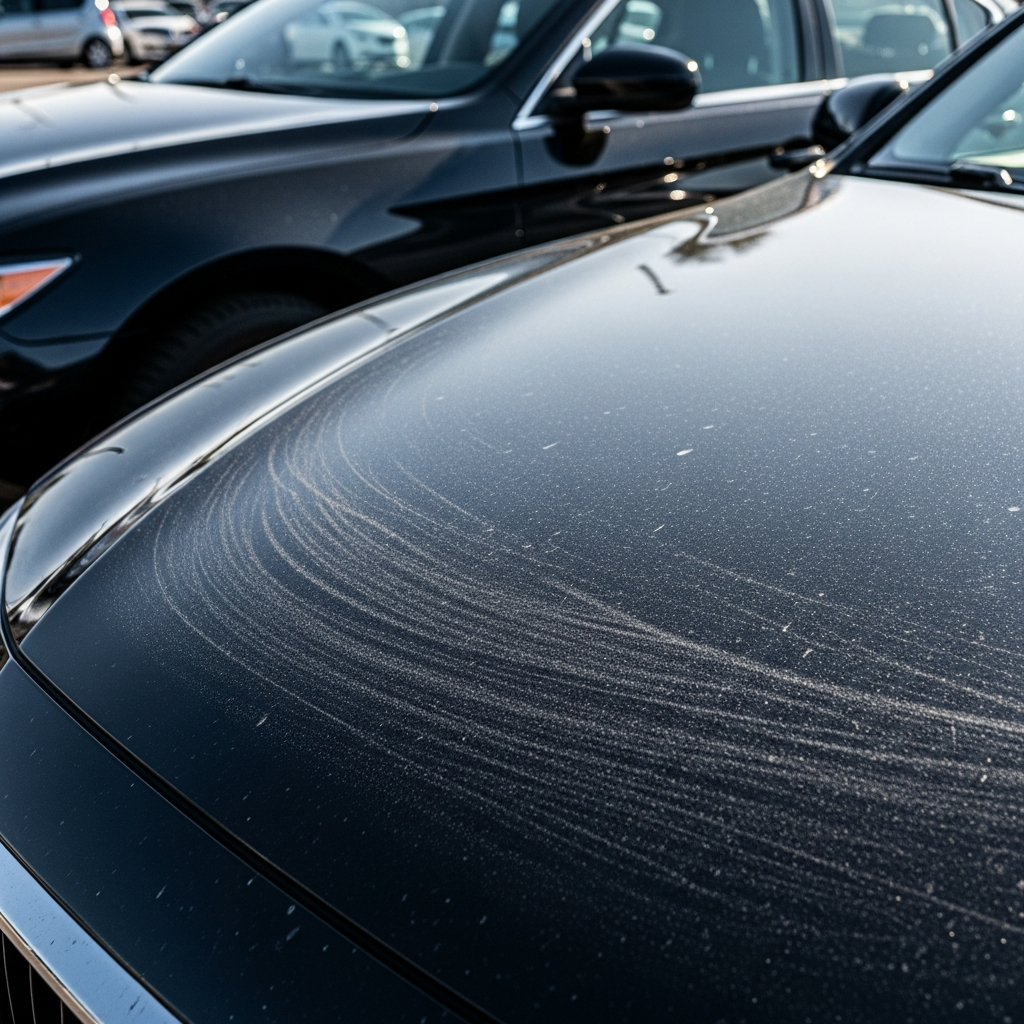
Correction paint for car surfaces is one of the most searched topics among car owners who want their vehicle to look clean, shiny, and well maintained. If you have ever walked up to your car on a sunny day and noticed tiny spider web marks all over the hood, you already know how frustrating it feels. Those marks are called swirl marks and they are one of the most common paint problems that car owners deal with.
The good news is that correction paint for car surfaces and a correction paint pen can help you fix many of these problems at home without spending a lot of money at a professional detailing shop. However, you need to understand what you are doing before you start. Using the wrong product or the wrong technique can make things worse instead of better.
This article explains everything you need to know about correction paint for car panels, how a correction paint pen works, when to use each one, and how to do a proper paint correction step by step. Everything is written in simple language so anyone can follow along even if you have never done this before.
What Is Correction Paint for Car Surfaces
Correction paint for car panels refers to products and techniques used to remove or reduce paint defects on a vehicle. These defects include swirl marks, light scratches, water spots, oxidation, and dull faded areas on the clear coat.
A car has several layers of paint. The bottom layer is the primer. On top of that is the base coat which gives the car its color. On top of the color is a clear coat which is a transparent protective layer that gives the paint its shine and protects it from UV rays, bird droppings, and other environmental damage.
Most paint defects like swirl marks and light scratches are not in the color layer. They are in the clear coat. This means correction paint for car surfaces works by removing a very thin layer of the clear coat to level out the surface and eliminate the scratches and marks.
When light hits a scratched surface, it bounces in many different directions which is why the marks look dull and messy. When the surface is smooth and level, light reflects evenly and the paint looks deep, glossy, and clean.
What Is a Correction Paint Pen
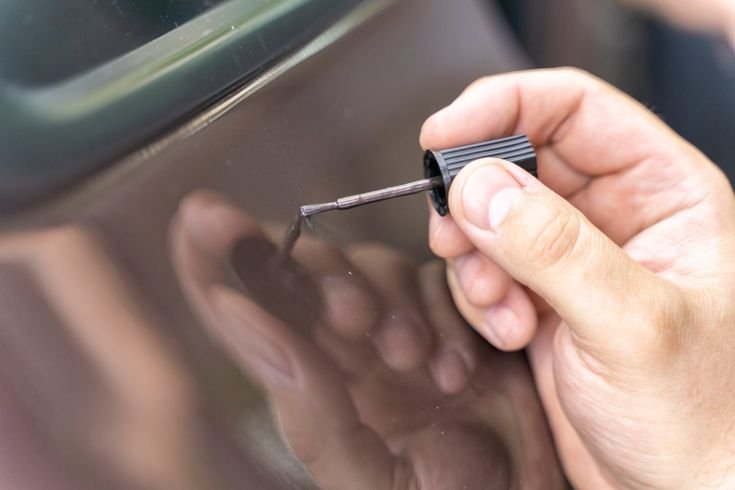
A correction paint pen is a small pen shaped tool that contains touch up paint. It is designed for fixing small chips, nicks, and deep scratches that have gone through the clear coat down to the color layer or even the bare metal.
A correction paint pen is not used for swirl marks or surface level scratches. It is used when the damage is deep enough that you can see the color of the car has been removed or you can see bare metal or primer.
Most car manufacturers and auto parts stores offer correction paint pens matched to specific car colors. You usually need your car’s color code which is found on a sticker inside the door jamb or under the hood to get the right match.
A correction paint pen is one of the easiest ways to fix small chips and scratches at home. It is cheap, easy to use, and can prevent rust from forming in areas where the metal is exposed.
Correction Paint Pen vs Full Paint Correction
Many people confuse a correction paint pen with full paint correction. These are two completely different things and it is important to understand which one you need.
A correction paint pen adds paint to an area where paint is missing. It fills in a chip or a deep scratch. It does not remove anything. After using a correction paint pen you may still need to lightly sand and polish the area to blend it in with the surrounding paint.
Full paint correction removes a very thin layer of the clear coat to eliminate surface defects like swirl marks, light scratches, and water spots. It does not add any paint. It smooths out the existing clear coat so the surface reflects light properly.
If your car has deep scratches or chips where you can see the bare metal or primer, use a correction paint pen first to fill in the damage. If your car has swirl marks, dull paint, water spots, or light surface scratches, you need paint correction using a machine polisher and polishing compounds.
In many cases you might need to do both. Fix the deep chips with a correction paint pen first and then do a full paint correction to address the overall surface condition.
How to Use a Correction Paint Pen
Using a correction paint pen is simple but there are steps you should follow to get a good result.
Step 1: Clean the Area
Before using a correction paint pen, clean the damaged area thoroughly. Use soap and water to remove any dirt and then wipe it dry with a clean microfiber cloth. You can also use a little rubbing alcohol on a cloth to make sure the area is completely clean and free of wax or grease.
Step 2: Shake the Pen Well
Shake the correction paint pen for at least one minute before using it. The paint inside needs to be mixed properly to get the right color and consistency.
Step 3: Test the Color
Before applying the correction paint pen to the scratch, test it on a hidden area of the car to make sure the color matches. Even if the color code is correct, slight differences can sometimes occur.
Step 4: Apply the Paint
Apply the correction paint pen carefully to the scratch or chip. Use light strokes and try to stay inside the damaged area only. Do not apply too much paint at once. It is better to do several thin layers than one thick layer.
Step 5: Let It Dry
Let the first layer dry completely before applying another one. Most correction paint pens need around 20 to 30 minutes between coats. Apply as many coats as needed until the chip or scratch is filled in level with the surrounding surface.
Step 6: Sand and Polish
Once the paint is fully dry, which usually takes 24 hours, you can lightly wet sand the area with very fine sandpaper to level it out. Then polish the area to blend the new paint with the surrounding clear coat. This step is optional for very small chips but it makes a big difference in how natural the repair looks.
Car Paint Correction Step by Step
Now here is how to do a full paint correction at home for swirl marks, water spots, and dull paint. This is for surface level defects in the clear coat, not deep scratches or chips.
What You Need
You will need a dual action machine polisher, cutting compound, finishing polish, orange cutting pads, white polishing pads, soft microfiber cloths, a clay bar kit, blue painter’s tape, and a pad cleaning brush.
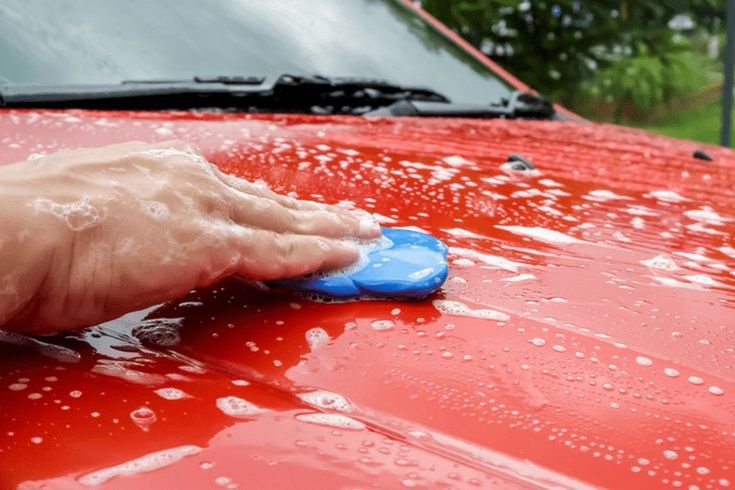
Step 1: Wash the Car Properly
Start with a thorough wash. Use the two bucket method. One bucket has your soapy water and the other has clean water for rinsing your wash mitt. Always wash from the top of the car down to the bottom. Dry the car completely with clean microfiber towels.
Do not skip this step. Washing over dirt will grind it into the paint and create more scratches. The car must be completely clean before you start any correction work.
Step 2: Clay Bar the Surface
After washing, run your hand over the paint. If it feels rough or gritty like sandpaper, there is contamination stuck in the clear coat that washing cannot remove. This is where the clay bar comes in.
Apply clay bar lubricant to a small section of the car. Then gently rub the clay bar back and forth over the surface. At first it will feel grabby. As the clay pulls out the contamination, it will start to feel smooth. Keep folding the clay to reveal a clean surface and work your way around the entire car.
After clay barring the paint should feel smooth like glass. This is the right starting point for correction paint for car surfaces.
Step 3: Tape Off Plastic and Rubber Trim
Use blue painter’s tape to cover all plastic trim, rubber seals, badges, and any sharp edges or corners. Polishing compounds can stain plastic trim and leave a white residue that is hard to remove. Taking a few minutes to tape everything off saves a lot of cleaning time later.
Step 4: Do a Test Spot
Before working on the whole car, pick a small hidden area like the bottom of a door panel and do a test. Apply four small drops of cutting compound to your orange cutting pad. Spread it slowly at low speed first to avoid splatter. Then increase the speed and work the product in using slow overlapping passes.
Remove the residue with a clean microfiber cloth and check the result under a bright light. If the swirl marks are gone and the paint looks clearer, you are on the right track. If the marks are still there, you may need a more aggressive compound.
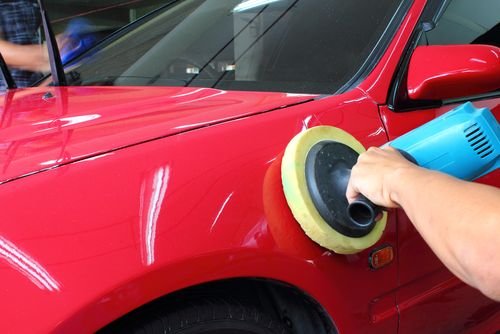
Step 5: The Cutting Stage
Work on the whole car in small sections about two feet by two feet at a time. Apply four drops of cutting compound to the orange pad. Work the product in using slow overlapping passes, first going horizontally and then vertically over the same section. This cross hatch pattern ensures even coverage.
Keep going until the compound turns into a clear thin haze. This means the abrasives have done their job. Wipe away the residue with a clean microfiber cloth and inspect the area under light.
After every two sections, clean your pad with a pad cleaning brush or replace it. A pad full of old dried compound loses its cutting ability and gives uneven results.
Step 6: The Polishing Stage
After completing the cutting stage on the whole car, switch to a white polishing pad and a finishing polish. The cutting stage removes the deep swirl marks but can leave behind very fine micro scratches and a slight haziness. The polishing stage refines the surface and brings out the full gloss and clarity.
Use the same technique as the cutting stage but at a slightly lower speed. Work section by section, apply the polish, work it in until it clears, and then wipe away the residue.
After this stage the paint should look very deep, wet, and reflective. This is the true paint correction result before any wax or sealant is added.
Step 7: Protect the Paint
After all that work, protecting the paint is essential. The clear coat is now fresh and exposed and needs protection from UV rays, bird droppings, and environmental damage.
Apply a paint sealant first. Sealants are synthetic products that bond to the clear coat and last longer than wax. After the sealant has cured, you can apply a layer of carnauba wax on top for extra warmth and depth.
Some car owners skip wax and go straight to a ceramic coating after paint correction. Ceramic coatings last much longer than wax or sealant but they are more expensive and harder to apply.
Common Mistakes to Avoid During Paint Correction
There are several mistakes that beginners make when doing correction paint for car surfaces. Avoiding these will save you time and prevent further damage.
Working in direct sunlight is one of the biggest mistakes. Heat causes the compounds to dry too fast and become very hard to remove. Always work in the shade or inside a garage.
Using too much product is another common mistake. More compound does not mean better results. Four small drops per section is enough. Too much product just creates a mess and splashes everywhere.
Not cleaning the polishing pads regularly causes old dried product to build up on the pad. This reduces cutting ability and can scratch the paint. Clean or replace your pads every two to three sections.
Pressing down too hard on the polisher does not make it work faster. The weight of the machine is enough pressure on its own. Pressing down too hard generates extra heat which can damage the clear coat.
Skipping the clay bar stage means you are polishing over contamination. Those particles can break loose during polishing and create new scratches.
How Often Should You Do Paint Correction
Full paint correction removes a thin layer of the clear coat each time it is done. Most factory clear coats are thick enough to handle three to five full corrections over the lifetime of the car. This means you should not do full paint correction every year.
If you maintain the paint properly after correction, which means washing carefully, using a paint sealant or ceramic coating, and avoiding automatic car washes with brushes, you may not need to do a full correction for several years.
For light swirl marks that appear between full corrections, a one step polish with a light compound is enough to refresh the paint without doing a full multi stage correction.
Professional vs DIY Paint Correction
Professional paint correction can cost anywhere from a few thousand to tens of thousands of rupees depending on the condition of the paint and the size of the vehicle. DIY paint correction requires buying a machine polisher and the necessary products which costs around five to eight thousand rupees upfront. After that initial investment, you have the tools for future corrections too.
DIY paint correction takes time. A full correction on an average sized car can take an entire weekend for a beginner. However the results can be just as good as professional work if you follow the right steps and take your time.
If the car has very deep scratches that catch your fingernail, heavily faded paint, or clear coat that is peeling off, professional help is a better option. But for normal swirl marks, water spots, and dull paint, doing it yourself with the right correction paint for car surfaces is very achievable.
Conclusion
Correction paint for car surfaces covers two main solutions depending on the type of damage. For deep chips and scratches where the color or metal is exposed, a correction paint pen is the right tool. It is easy to use, affordable, and prevents rust from forming in damaged areas.
For swirl marks, dull paint, water spots, and surface level scratches in the clear coat, full paint correction using a machine polisher and cutting compounds is the answer. It takes more time and effort but the results are incredible. Paint that looked old and tired can look better than it did when the car was new.
The key is to understand which problem you have and use the right solution. Take your time, follow the steps properly, and protect the paint after you are done. A well corrected and protected paint job can stay looking great for years.

Adnan Aslam is passionate about helping everyday drivers understand their vehicles better. Through CarFixedExpert.com, he shares clear, step-by-step car maintenance guides written in simple language. His goal is to make basic repairs and maintenance easy, safe, and affordable for everyone.
He believes that even small car knowledge can save money and prevent major problems. His content focuses on practical advice, safety awareness, and beginner-friendly explanations.