How I Changed BMW Brake Pads Myself (And Almost Regretted It)
My friend Omar has this thing about his BMW. He treats it like a second child. So when he called me one evening saying his brakes were making a squealing noise and a warning light had popped up on the dash, I could hear the stress in his voice.
“Relax,” I told him. “Come over.”
He pulled up, I took it for a short drive around the block, and I knew immediately. Brake pads were worn down. I had felt that same spongy, slightly delayed brake response on my own car a couple years back and ignored it for two weeks longer than I should have. Learned that lesson the expensive way.
We looked up the dealership quote online just out of curiosity. For front brake pad replacement on his 2017 BMW 3 Series, they wanted close to $400.
Omar looked at me. I looked at him.
“We are doing this ourselves,” I said.
He took about three seconds to agree.
Before You Start—BMW Brakes Work Differently Than Most Cars
This is the part most people skip and then wonder why something goes wrong halfway through the job.
BMW uses an electronic brake wear sensor system. It is a small wire built directly into the brake pad. As the pad wears down over time, the sensor wire eventually contacts the spinning rotor, completes a circuit, and triggers that warning light on your dashboard.
What this means for you is simple. When you replace the pads, you also have to replace the wear sensors. They are a separate part you have to buy. If you swap in fresh pads and forget the sensors, that warning light will stay on no matter what.
I made this exact mistake the first time I did this job. Put in the new pads, started the car, and the light was still on. Spent 20 minutes confused and annoyed before I figured out what I had missed. Learn from my moment of embarrassment and just buy the sensors along with the pads.
What You Will Need
Gather everything before you start. Nothing kills momentum like having your car on jack stands and realizing you are missing one small tool.
Tools You Will Need:
- Floor jack and jack stands—you need both, not just the jack
- 17mm socket for the wheel bolts
- 13mm socket for the caliper bolts
- 7mm Allen key
- Brake piston wind-back tool—this is critical for rear brakes on BMW; more on this in a moment
- Torque wrench
- Small wire brush
- Brake cleaner spray
- Brake caliper grease—just a small tube is fine
- A piece of wire or a bungee cord to hang the caliper
Parts You Will Need:
- Front brake pads—Textar and Brembo are both solid choices for BMW
- Front brake wear sensors—get two, one for each side
- Rotors if yours are heavily grooved or worn thin
One thing worth saying clearly on parts. Different BMW models use different brake pad sizes. A 3 Series, a 5 Series, and an X5 do not share the same parts. Before you order anything, look up your exact model year and chassis code. Getting the wrong size means the job stops cold until you can exchange them.
Step 1: Get the Car Ready
Park on a flat, solid surface. Concrete or asphalt, not gravel. Engage the parking brake.
Before you jack the car up, go ahead and loosen the wheel bolts while the tire is still sitting on the ground. Just break them loose; do not remove them yet. This stops the wheel from spinning freely when you apply force.
Now find the correct jack points. BMW has specific reinforced jack points under the vehicle, usually marked by a small notch or triangle indicator along the sill. Always use these. Never stick a jack under a random spot on the body panels or the floor. I did this once on a different car, was careless about placement, and slightly bent a section of the sill. Small mistake, annoying result.
Get the car up on jack stands, pull the wheel off, and set it aside.
Step 2: Look at What You Are Actually Working With
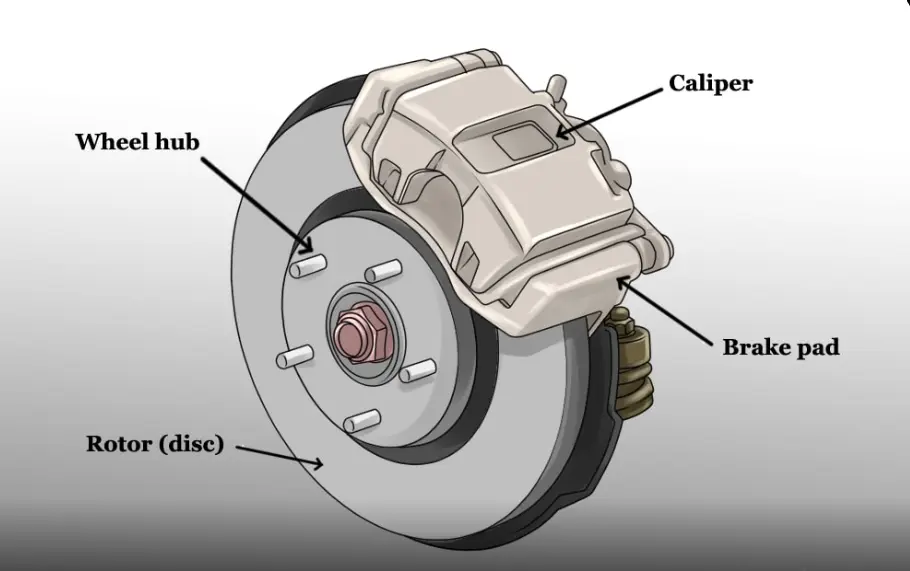
With the wheel off, you now have a clear view of the brake assembly. You will see three main things: the rotor, which is the large round disc. The caliper, which is the clamp-like assembly that squeezes the rotor when you brake. And the pads, which sit inside the caliper on both sides of the rotor.
Before you do anything else, look closely at the rotor. Run your finger lightly across the surface. If there are deep grooves cut into it, or if the rotor looks noticeably thin at the edges, you should replace the rotor along with the pads.
New pads on a badly worn rotor will not perform the way they should. They will also wear unevenly and wear out faster than they otherwise would. It is not worth skipping the rotor to save a little money if it genuinely needs replacing.
If the surface looks relatively smooth with only some light surface rust from sitting, you are fine to continue with just the pads.
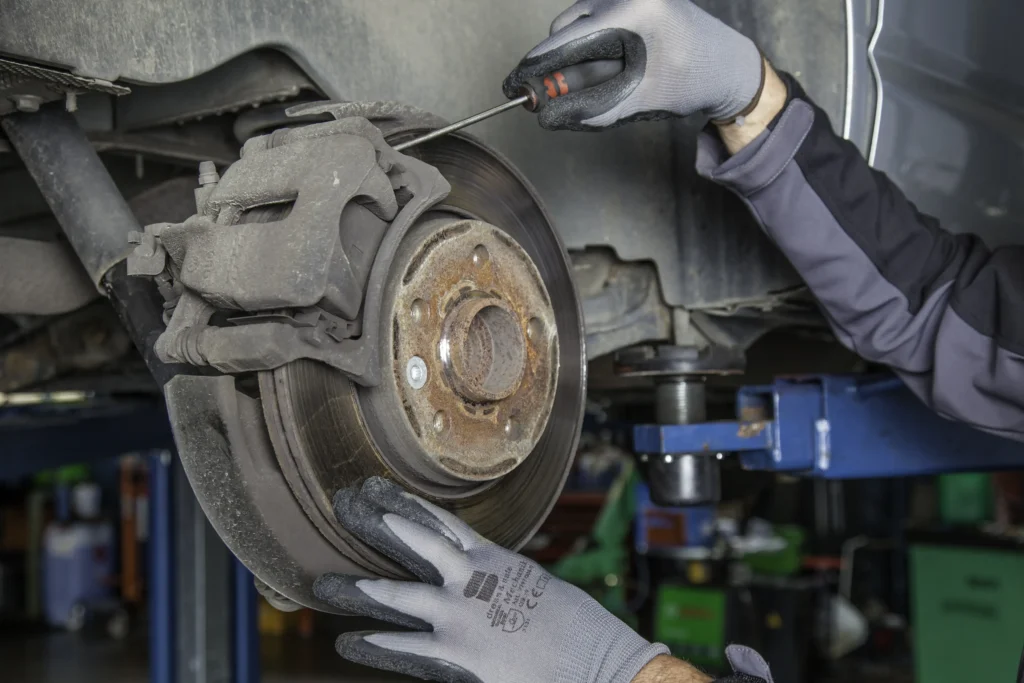
Step 3: Remove the Caliper
On the backside of the caliper, you will see two guide pin bolts. On the BMW 3 Series, these are 13 mm. Remove both of them.
The caliper will now be free from the bracket. Do not let it hang by the brake line. The brake line is flexible, but it is not built to support the full weight of the caliper, and you can damage it if it hangs unsupported. Use a piece of wire or a bungee cord looped around the upper control arm or the coil spring to hold the caliper in place while you work.
I have used a shoelace for this before when I could not find wire quickly. It worked perfectly fine.
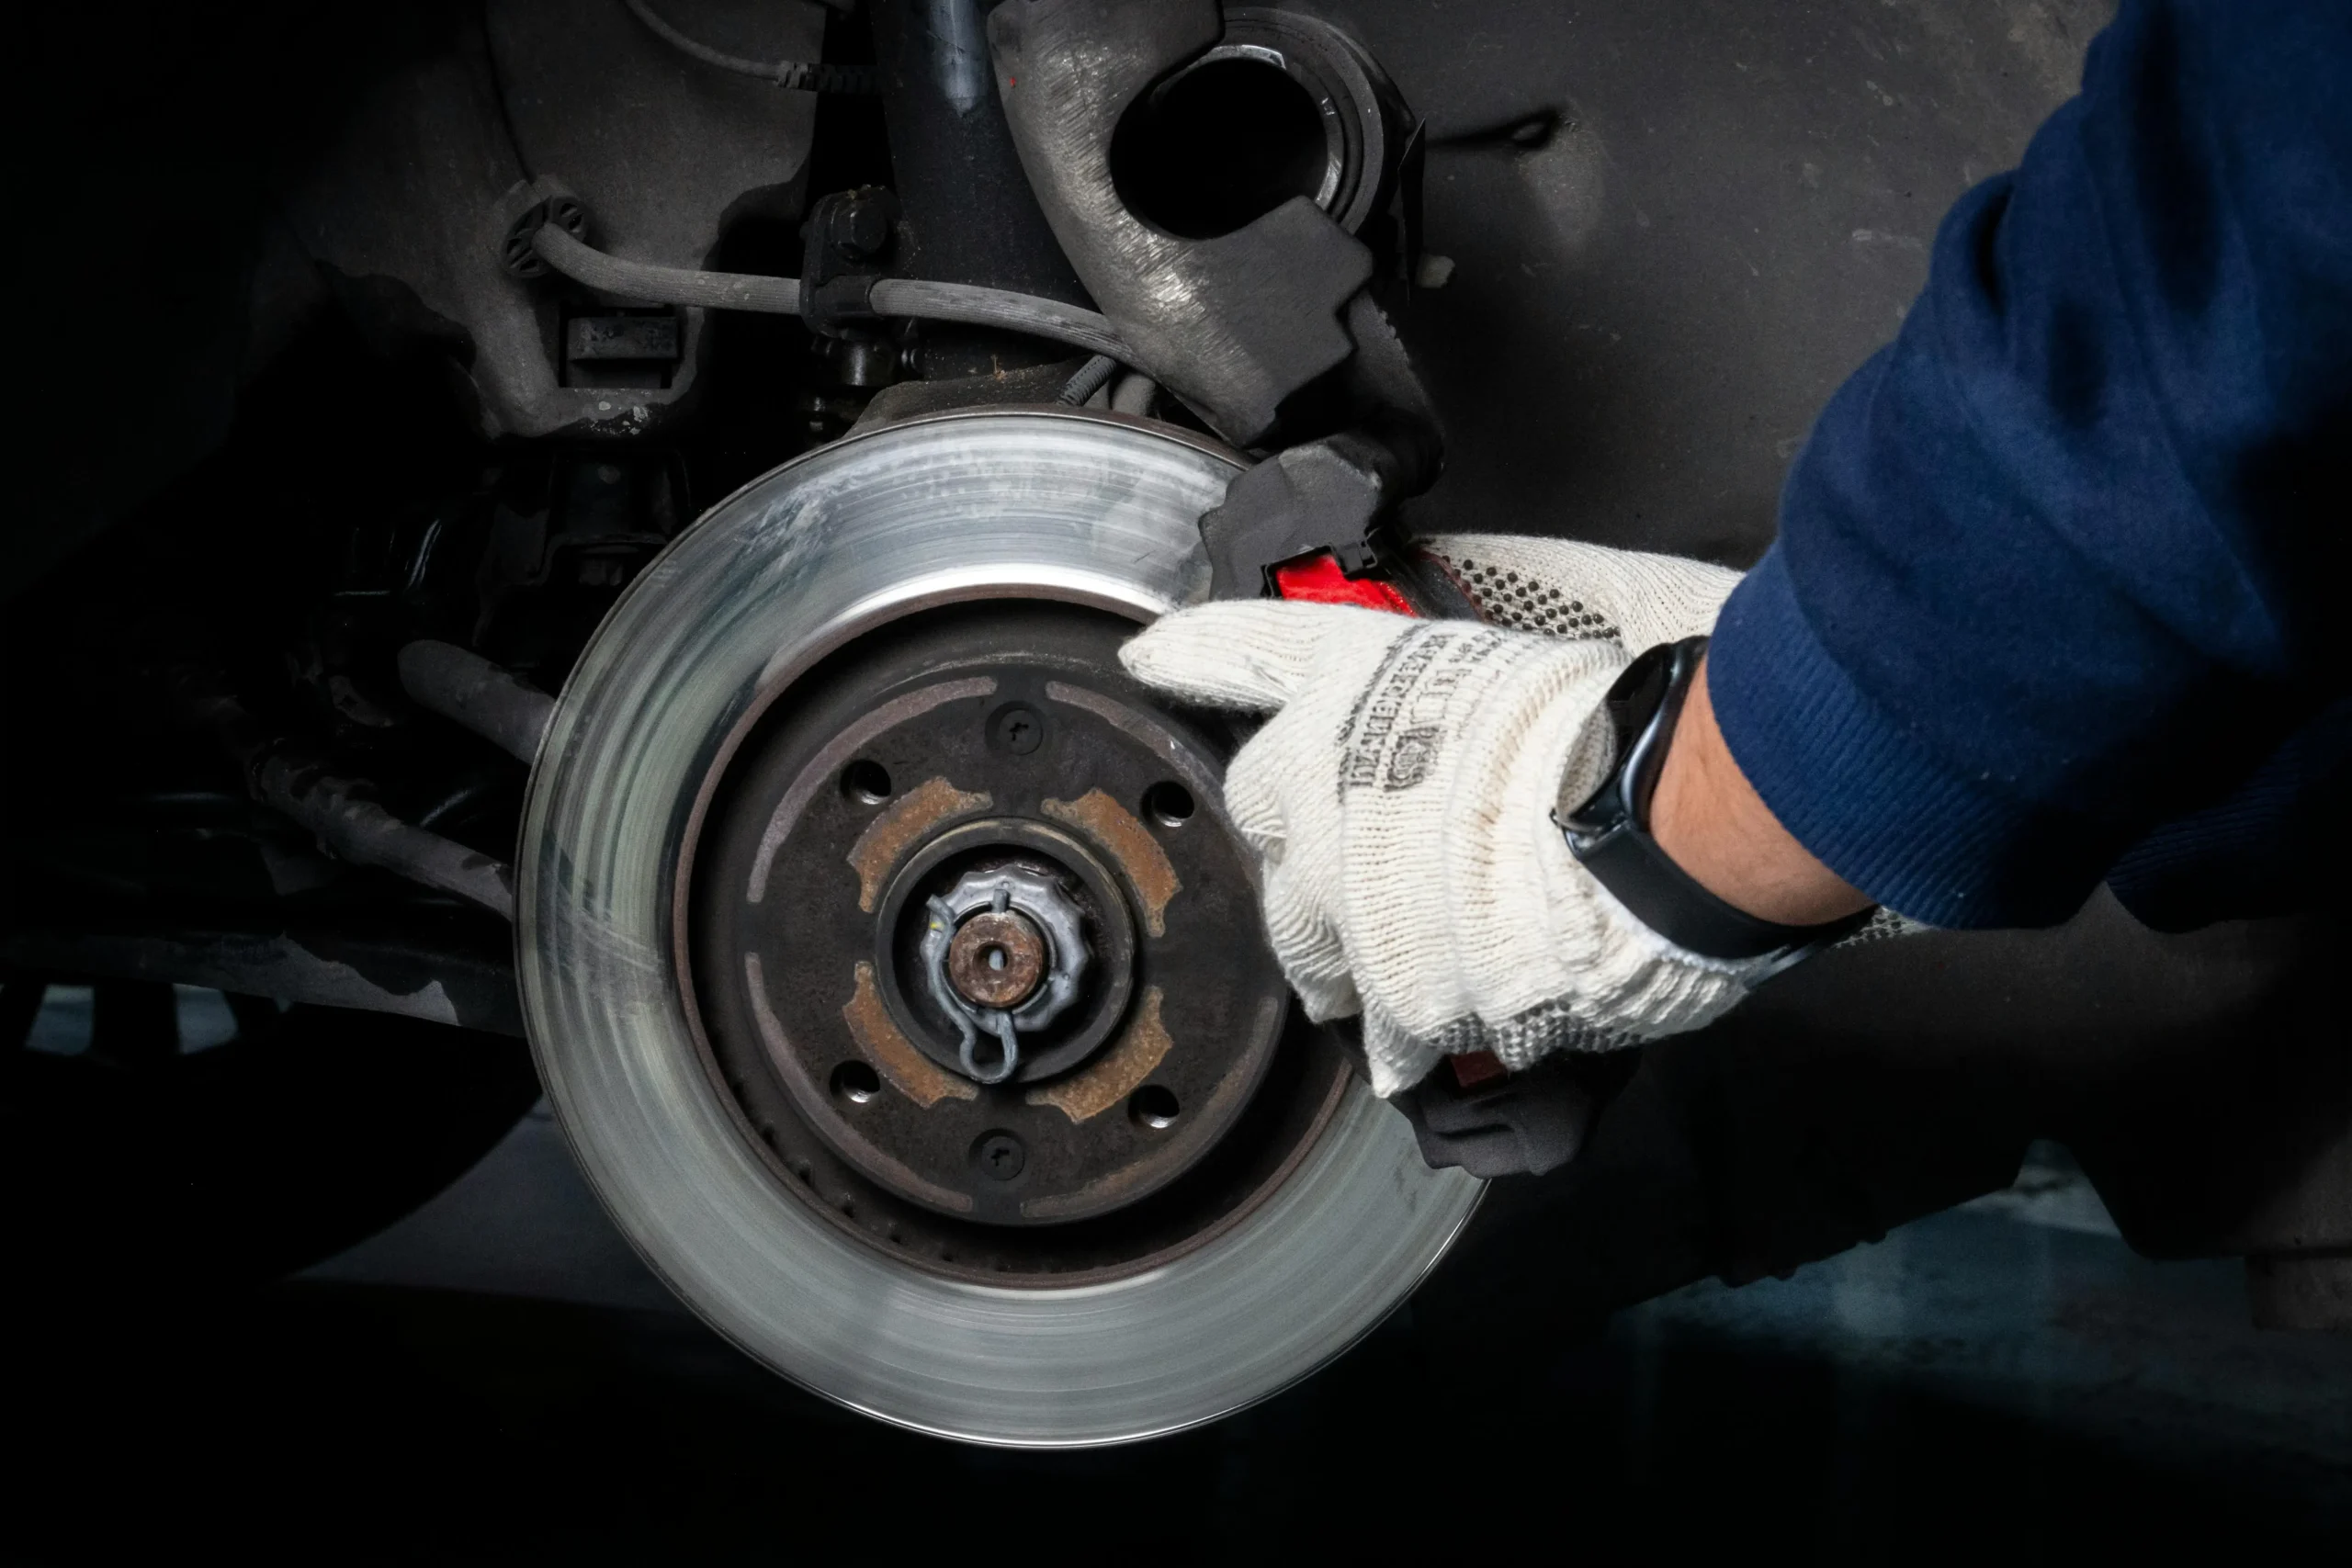
With the caliper safely suspended, slide the old pads out of the bracket. They clip in and may take a bit of firm pressure to release, but they will come out cleanly.
Step 4: Compress the Caliper Piston
This step is where a lot of first-timers run into trouble, and if you have a BMW, it has one extra thing you need to know.
New brake pads are thick. The caliper piston is currently sitting in the extended position it settled into as your old pads wore down to almost nothing. To fit new thick pads back in, you need to push that piston back inside the caliper body.
For the front calipers on most BMWs, the piston pushes straight back in. You can do this by placing an old pad face-down against the piston and using a C-clamp to slowly press it back, or use a proper brake piston compression tool, which makes it easier and cleaner.
For the rear calipers on BMW, it is a completely different story. The rear piston does not compress straight inward. It has to be rotated clockwise while simultaneously being pushed in, essentially like threading a large bolt. You need a rear brake piston wind-back tool to do this properly. If you try to force it straight in without rotating it, you will damage the piston seal. At that point you are no longer doing a brake pad job; you are doing a caliper rebuild. Do not skip this tool.
One more thing before you compress the piston. As it pushes back in, brake fluid gets displaced back up through the line into the reservoir under the hood. If that reservoir is already sitting at the maximum fill line, the fluid will overflow and make a mess on your engine bay. Check the reservoir level before you start and remove a small amount of fluid if it is sitting very high.
Step 5: Replace the Wear Sensors
Do not forget this step. Seriously.
The wear sensor is a small wired clip attached to the brake pad with a connector that plugs into the vehicle’s wiring harness. Unplug the connector from the harness, unclip the old sensor from the worn pad, and clip the new sensor onto your new pad. Then plug the connector back into the harness.
It should click firmly into place. If it feels loose or you are not sure it is seated correctly, check it again. A sensor connector that is not fully seated will leave that brake warning light on the dashboard, and you will spend time troubleshooting something that only needed one extra push to click home.
Step 6: Clean the Bracket and Install the New Pads
Take your wire brush and scrub out the caliper bracket channels. These are the slots where the edges of the brake pads slide in and out. They collect rust, grit, and old debris over time, and dirty channels cause the pads to drag or stick instead of moving freely.
Give the whole bracket a spray with brake cleaner and let it dry completely.
Now apply a thin amount of brake caliper grease to the metal contact points on the bracket, specifically the areas where the pad ear edges sit against the bracket. This helps the pads slide smoothly and reduces noise.
Keep the grease away from the pad friction surface and away from the rotor entirely. Grease on either of those surfaces means compromised braking. That is not a small problem.
Slide the new pads into position in the bracket. They should sit firmly and evenly without wobbling.
Step 7: Reinstall the Caliper
Carefully slide the caliper back over the new pads and onto the bracket. The new pads are thicker than the worn ones, so it will feel tighter than when you removed it. This is normal.
Thread the guide pin bolts back in by hand first to make sure they catch the threads cleanly. Then tighten them with your torque wrench. For the BMW 3 Series, the caliper guide pin bolts torque to 25 Nm. Do not just crank them as tight as you can by feel. Use the torque wrench.
Reconnect the wear sensor wiring connector if you have not already done so.
Step 8: Put the Wheel Back On and Bed the Brakes
Mount the wheel, thread the bolts in by hand, then lower the car off the jack stands until the tire is on the ground and taking the vehicle’s weight.
Torque the wheel bolts to spec. For most BMW models this is 120 Nm, but check your owner’s manual to confirm for your specific model.
Now before you drive anywhere, do this. Sit in the car with the engine off and pump the brake pedal repeatedly until it feels firm. The first several pumps will feel very soft and may go nearly to the floor. This is normal. You are pushing the pistons back out to contact the new pads. Keep pumping until the pedal feels solid and normal.
Then go for a careful test drive. Find a quiet road and do about 10 moderate stops from 30 mph. Not hard emergency stops, just smooth, firm braking. This is called bedding the brakes. It transfers an even layer of pad material onto the rotor surface and is how you get full braking performance from new pads. Skip this and your brakes will not work as well as they should for the first several hundred miles.
What It Cost Us vs. the Dealership
When everything was done, Omar and I added up what we spent.
Textar front brake pads came to around $45. Two wear sensors were about $18 total. Brake cleaner and grease we already had in the garage. The brake piston tool was $22, and we will use it again on future jobs.
Total out of pocket: roughly $85.
The dealership had quoted $380 for the same job on the front axle only.
We saved almost $300, and the whole job took us about two hours, including one trip to the parts store because I initially forgot to grab new sensors. Classic.
When You Should Not Do This Yourself
I want to be straight with you here because this is your braking system and it matters.
If you open up the caliper and find the piston is corroded, leaking brake fluid, or will not compress at all, stop. That caliper needs to be rebuilt or replaced, and if you are not comfortable doing that, take it to a shop.
If the brake lines look cracked, soft, or are weeping fluid anywhere, that is also not a DIY moment unless you have experience with brake hydraulics.
And if after your test drive the pedal still feels soft and spongy even after pumping it fully, that usually means air has entered the brake line. You will need to bleed the brakes before that vehicle is safe to drive normally.
The pad swap itself is genuinely approachable for anyone who is patient and methodical. But know where your limits are. There is no shame in handing certain parts of a brake job to a professional mechanic.
One Last Thing Omar Said
After the test drive, Omar parked the car, stepped out, and said, “That actually feels better than it did before the light came on.”
Which honestly tracks. By the time that warning light triggers, the pads are already pretty far gone. Fresh pads with a clean rotor surface genuinely do feel more responsive.
He also said he would never pay dealership prices for a brake pad job again.
Neither would I.
If you have done your oil changes yourself and you are comfortable with basic tools, this job is completely within reach. Take your time, do not rush the piston compression step, and do not forget the wear sensors.
Your wallet will thank you. And so will your brakes.

Adnan Aslam is passionate about helping everyday drivers understand their vehicles better. Through CarFixedExpert.com, he shares clear, step-by-step car maintenance guides written in simple language. His goal is to make basic repairs and maintenance easy, safe, and affordable for everyone.
He believes that even small car knowledge can save money and prevent major problems. His content focuses on practical advice, safety awareness, and beginner-friendly explanations.