My full step-by-step guide on how to wax a car the right way for a showroom shine
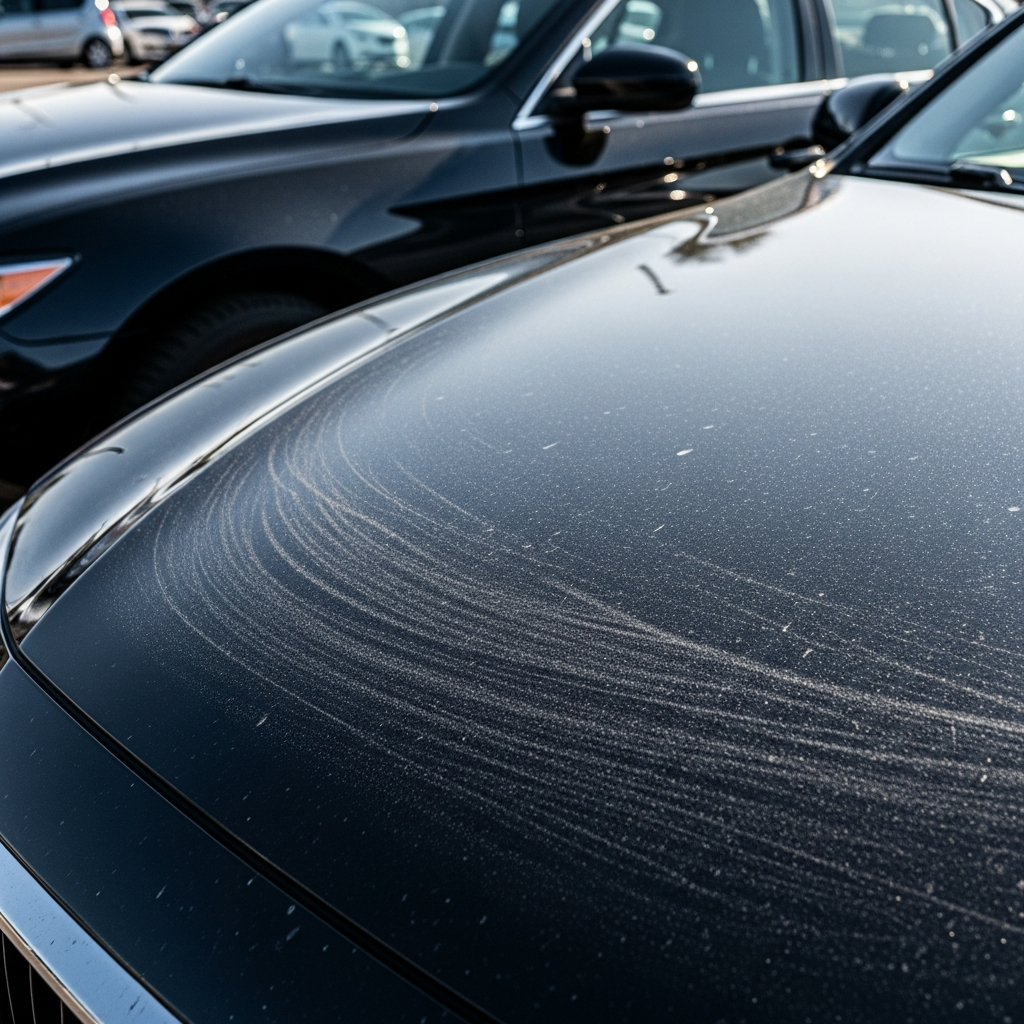
One morning, on my way to the car, I was struck by a sight. The sun, hitting the hood just right, revealed what looked like thousands of minuscule spider webs, instead of the deep, glossy finish I once cherished. Swirl marks were everywhere.
I detected uneven areas when I ran my finger over the paint. To be honest, I felt a little depressed.
I used to wash this car every weekend, and I was proud to maintain the paint spotless. Unbeknownst to me, I had been causing damage to the finish with my own washing practices at some point. At that point, I became aware that I needed to learn more about automobile paint correction. Although I had seen the term “car paint correction” used in YouTube videos and car forums, I had never truly grasped its meaning. Was that simply a fancy way of expressing “polishing”? Would the repair run me into the thousands of rupees? And, crucially, could I even attempt to fix it myself without making things worse?
I eventually found out how to correctly repair automobile paint after months of trial and error, endless hours of watching tutorials, and numerous mistakes that made me want to rip my hair out. In order to save you from experiencing the same misunderstanding I did, allow me to explain what I have learnt about automobile paint correction
The True Meaning of Paint Correction
This is what I discovered really soon. Detailing and waxing are not the same as paint repair. When I used to take my car in for a wash and they offered “polishing,” they would typically merely apply something to temporarily cover the scratches. For a week or two, it appeared fine, but the swirls quickly returned. Paint correction in real life is not the same.
In order to level the surface and get rid of flaws, paint correction entails actually removing a little layer of your clear coat. Consider it similar to sanding a piece of wood. To get rid of severe scratches, start with rough grit and work your way down to finer grit until the surface is flawlessly smooth. Your car’s clear coat functions similarly. In essence, you are smoothing out all those hills and valleys when you adjust the paint so that the surface reflects light flawlessly.
The purpose of the clear coat is to shield your base paint from everything the road throws at it, including UV rays and bird droppings. I was so anxious when I initially discovered that correction required taking off a portion of that clear coat. To what extent is it too much? Is it possible for me to inadvertently sand through to the color layer? These were legitimate worries, and to be honest, they ought to be for anyone doing this at home.
The Realization That I Needed Paint Correction
Let me describe the state of my car that sent me over the brink before I go into the detailed procedure. The difference was embarrassing when I parked next to my friend’s almost new vehicle one afternoon. His paint had the appearance of liquid glass. Mine appeared worn out and exhausted. There were swirl marks everywhere, although they were more noticeable on dark panels. No matter how hard I washed, some water stains would not go away. Additionally, there was bonded pollution entrenched in the clear coat since the hood felt scratchy, like fine sandpaper.
At that moment, I realized I had two options. The first choice was to ignore it and watch the paint deteriorate over time. However, I could also learn how to properly fix it. One of the best choices I’ve ever made for my car was to go with option number two.
Acquiring the Appropriate Equipment and Items
a Machine Polisher Is Important
My initial error Why was believing that I could complete this task by myself. I’ll spare you the hassle. You are unable to. Because paint repair requires constant action and pressure over extended periods of time, a machine polisher is necessary. In fact, hand polishing produces unequal results, and your arm will break long before the paint is fixed.
Selecting the Appropriate Polisher
My finest purchase was a dual-action polisher. Dual-action polishers are far safer for novices than the outdated rotary polishers, which may burn through paint if you look at them incorrectly. They avoid heat accumulation and lessen the possibility of harming your clear coat by moving in an erratic circle.
Comprehending Polishing Pads
I discovered that different colors for pads correspond to varying degrees of aggression. In order to remove deeper scratches, I picked up a couple orange pads for cutting. White pads are used for polishing in order to improve the finish. The ideal pads for applying sealer or wax at the end are red or black. Having several pads is important because they must be replaced on a regular basis due to product buildup.
An explanation of compounds and polishes
At first, compounds and polishes were bewildering. The hard lifting of eliminating swirl markings is done by the cutting compound, which is more abrasive. The cutting stage’s haze is eliminated by the finer polishing chemical. I began with the Meguiar’s M105 and M205 combination because I had read that it was both effective and beginner-friendly.
The Significance of Microfiber Tools
Microfiber towels are not inewexpensive. I discovered this the hard way when, shortly after polishing the paint, a rough towel caused fresh scratches. Soft, high-quality microfiber towels have a significant impact.
The Essential Clay Bar
When I discovered how much contamination was embedded in my paint, a clay bar kit proved indispensable. Washing doesn’t get rid of everything. You can’t see or feel embedded particles until you run your fingers over the paint, but the clay bar extracts them.
Don’t Forget the Masking Tape
Before I unintentionally got compound on my plastic trim and had to spend an hour cleaning it off, masking tape didn’t seem necessary. I now record everything before I begin.
First Step: Cleaning and Setting Up the Surface
I can’t emphasize this enough. Don’t neglect the preparation. When I initially attempted paint correction, I was so eager to begin polishing that I quickly rinsed the car before getting started. Big error. I just made more scrapes and ground dirt into the paint.
A thorough wash utilizing the two-bucket approach is the first step in proper preparation. To rinse your mitt, use one bucket of clean water and another of soapy water. Dry the car entirely with fresh microfiber towels after working from the top down. Water that remains on the surface will eventually interfere with your compounds.
I washed and then touched the paint with my hand. The fact that it still felt scratchy indicated that bonded pollution was there and could not be removed by washing. I pulled out the clay bar at that point. After applying lubricant to a tiny area, I carefully moved the clay bar over the surface. As the clay removed the impurities, the initial passes felt grabby before abruptly becoming smooth. I made my way around the entire car, continuously folding the clay to reveal a new surface. The paint felt like glass by the time I was done. Even without any polishing, that was pleasant in and of itself.
Taping Off Sensitive Areas in Step Two
Although this procedure seems laborious, I assure you that it will prevent headaches in the future. I covered all of the plastic trim, rubber seals, emblems, and any corners where polish could get stuck with blue painter’s tape. If compound and polish are left on unprotected trim for an extended period of time, they can color it white. I saved an hour of cleaning residue out of cracks by taking fifteen minutes to properly tape everything.
Step Three: The Test Location
Before attacking the entire car, I tried my mixture on a small section of the rear quarter panel. Here, I found what works for my specific paint. I spread four tiny drops of cutting compound on an orange pad, increased the speed, and worked the product in with overlapping passes.
After removing the residue, I examined the region under a bright light.The difference was apparent right away. The paint had depth I hadn’t seen in years, and the swirls had vanished. However, there was also some residual haze, which indicated that I required the subsequent polishing procedure. I was able to avoid doing the entire car and subsequently realizing that I required a different strategy thanks to the test place.
Step Four: The Stage of Cutting
The real work was about to begin. I worked two feet by two feet at a time, dividing the car into portions. After applying four drops of cutting compound to the orange pad and spreading it slowly, I turned the polisher up to speed five and began using the product.
The key is going gently. Slowly, about one inch each second. Using a cross-hatch technique, I covered the same region first horizontally and then vertically. This guarantees thorough coverage and reliable correction. I continued working until the compound changed from a liquid to a transparent haze, indicating that the abrasives had degraded and completed their task.
The paint underlying was shown once the residue was removed with a fresh microfiber towel. To be honest, it was really satisfying to watch those swirl markings vanish section by section. Each portion looked better than the last. Because my pads became overloaded with spent product and lose their cutting power, I cleaned them every two panels.
Step Five: The Stage of Polishing
I took a step back to appreciate the effort after completing the cutting stage on the entire automobile. The severe scrapes had disappeared, but a faint dullness or haze remained. That’s typical. Aggressive material removal occurs during the cutting stage, leaving behind micro-marring that requires refinement.
I used the finishing polish after switching to a white polishing pad. The same procedure is used: spread four drops per section at a low speed, then work at a medium speed until the product clears. The clarity and gloss were enhanced by this procedure. This time, the paint appeared moist when I removed the residue. It is very deep and reflective, not glossy like wax makes it appear.
Step Six: Safeguarding All That Effort
I had to learn this lesson the hard way. All of that labor is rapidly undone if the paint is not protected after repair. Now that the clear layer is new and exposed, it need protection from UV radiation, bird droppings, and other environmental factors.
Since sealant lasts longer than wax, I used it first. For more warmth and depth, I applied a layer of carnauba wax on top. For my daily driving, the sealer and wax combination works flawlessly, although other people skip the wax and go directly to ceramic coatings.
Using a fast detailer to remove any smudges and make everything flawless was the last step. I honestly couldn’t quit staring when I pulled the car out into the sun. Compared to the day I purchased the automobile, the paint looked nicer. more reflective, smoother, and deeper. Just pure gloss, no haze, no swirl marks.
Errors I Made to Save You
In retrospect, I realize that my initial attempts at paint repair were riddled with mistakes. I’ll share them with you so you don’t experience the same annoyances.
My worst early error was working in direct sunlight. Compounds dry too rapidly because to the heat, making removal challenging. In the end, I had unequal results with residue lodged in cracks. I now exclusively work indoors or in the shade.
At first, using too much product looked like a wonderful idea. More correction must follow from more compound, right? Incorrect. An excessive amount of product simply splatters all over the place, creating a mess. It is sufficient to use four little drops each region.
I was spreading out old, dried compound rather than new substance since I wasn’t cleaning my pads often enough. I now use a pad cleaning brush to clean my pads every two or three panels.
Another beginner error was applying too much pressure to the polisher. The machine’s weight is sufficient. Let the pad and the product take care of the rest. Heat is produced by excessive pressure, which might harm the clear coat.
Although it appeared to save time to skip the clay bar stage, I was actually polishing over impurities that finally broke loose and produced further scratches. I no longer neglect decontamination.
How Frequently Should Paint Correction Be Done?
The good news is as follows. You shouldn’t have to repeat this procedure for years if you take good care of your paint after repair. Clear coat is removed during full paint correction, and your options are limited. Over the course of the vehicle’s life, the majority of factory paint jobs have enough clear coat for three to five correct adjustments.
After making my fix, I completely transformed the way I wash the car.
Despite what they claim, the brushes in automatic car washes leave swirl marks, so I completely stopped using them. I now employ the two-bucket method and a microfiber cloth. To prevent dragging anything across the paint, I used a leaf blower for drying instead of towels.
I also use a fast detailer with spray wax after each wash to preserve protection.
Instead of making a complete correction, I can apply a quick one-step polish on the spots where I see light swirls beginning to appear.
Do you need to do your own paint correction?
How patient are you and how much do you care about the outcome? Professional paint correction can cost anywhere from $200 to $1,500, depending on how poor your paint is. A good polisher and other equipment could cost two to three hundred dollars if you do it yourself. You’ll also have the tools for later. However, this is the reality. Doing it yourself takes time. My first complete adjustment took me the entire weekend. I was exhausted, sore, and questioning whether I had made the proper decisions in life halfway through.
However, every minute was worthwhile when I saw the finished product. You may want to seek professional assistance if your car has significant damage, deep scratches that snag your fingernail, or a clear coat that isn’t functioning. However, you can achieve results that make you proud every time you see your automobile if you do it yourself for common swirl marks, damp spots, and faded paint.
How Driving a Fixed Car Feels
My happiness at being able to stroll up to my car now is beyond words. the way light strikes the hood without altering it. reflections that are crisp and distinct rather than hazy. The way other car enthusiasts give it a nod of approval. I discovered that paint correction is more than just improving the car’s appearance for other people. It’s about knowing that your paint is truly preserved and not just covered up with temporary fillers, acquiring a skill that will save you money over time, and taking care of what you own.
I can tell you from experience that there is anything you can do about those swirl marks on your car. You must have the necessary resources, be patient, and be open to learning from your errors. But the first time you see the flawless paint underneath after removing the residue? All of the effort is worthwhile because of that sensation. Take your time, watch some tutorials, get a polisher, and fix your car correctly. You won’t be sorry.