Why Your Car Brakes Make Noise and How to Fix It
Car brakes are one of the most important safety systems in your vehicle. If your brakes start making noise, it is a warning sign that something is wrong. For instance, if you notice brakes grinding at low speed, this is particularly concerning because it often indicates serious wear. Ignoring brake noise can lead to bigger problems, expensive repairs, or even unsafe driving conditions. Fortunately, this guide explains why brakes make noise and shows simple ways to fix the problem at home without any professional experience. Specifically, we will help you understand what causes brakes grinding at low speed and how to address it before further damage occurs. Consequently, you will learn to identify whether the grinding comes from worn pads, debris, or damaged rotors. Moreover, catching brakes grinding at low speed early can save you hundreds of dollars in rotor replacement costs. Therefore, pay close attention to that grinding sound and take action immediately. In fact, brakes grinding at low speed is one of those warning signs you should never ignore.
Common Reasons Brakes Make Noise
1. Worn Brake Pads
The most common cause of brake noise is simply worn brake pads. These pads come with a small metal indicator that squeals when the pad becomes too thin. Consequently, you hear that high-pitched sound telling you it is time for replacement.
If you hear squealing, it means your pads need attention soon. However, if you hear grinding, the situation is more serious. Grinding indicates that the pads are completely worn and the metal backing is now rubbing directly against the rotor. In this case, ignoring the problem can damage the rotors and significantly increase your repair costs.
2. Glazed Brake Pads
Sometimes brake pads overheat from hard or prolonged braking. When this happens, they develop a smooth, shiny surface called glazing. Interestingly, glazed pads can cause squealing or squeaking even when they are not completely worn out. Therefore, you might hear noise despite having plenty of pad material left. A simple solution is to sand the surface lightly with sandpaper or replace the pads entirely.
3. Dirt, Dust, or Debris
Brake dust, road dirt, or small stones can sometimes get trapped between the pads and rotor. As you might expect, this causes noise every time you apply the brakes. The good news is that fixing this issue is usually straightforward. You can clean the rotor and pad surface thoroughly using a brake cleaner and a soft brush.
4. Loose or Worn Hardware
Over time, the caliper, clips, or shims that hold everything together may become loose or worn out. Consequently, this creates vibration and noise when you brake. To address this, you should check all hardware components and either tighten them or replace anything that looks damaged.
5. Moisture or Rust
After driving in rain or snow, moisture can cause a thin layer of rust to form on the rotor surface. This typically produces a squeaky noise during the first few stops. Fortunately, light braking a few times usually removes the rust and the noise goes away on its own.
How to Fix Brake Noise at Home
Step 1: Inspect the Brake Pads Thoroughly
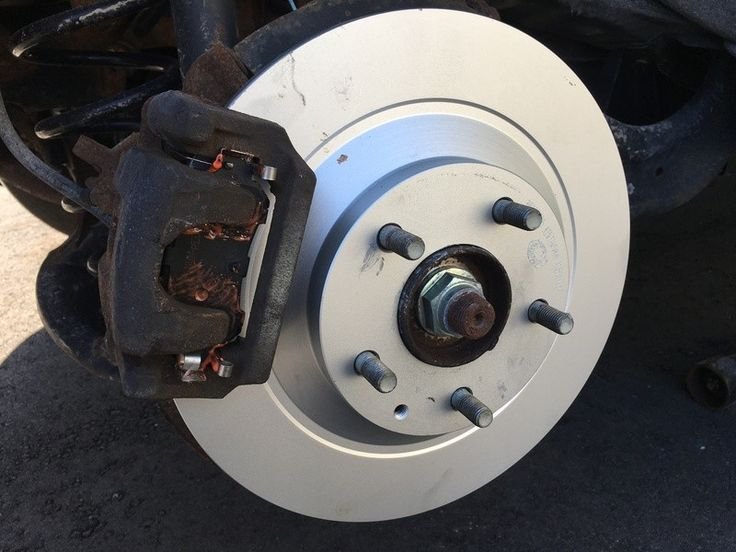
To begin with, look through the wheel spokes to get a view of the brake pads. If you cannot see clearly, remove the wheel entirely for a better inspection. Check the thickness of the pads carefully. As a general rule, you should replace them if they are below the recommended thickness, which is usually around three millimeters.
Step 2: Clean Rotors and Pads Properly
Next, remove any dust, dirt, or small debris that might have accumulated. Use a brake cleaner spray along with a soft cloth or brush to wipe everything down. One important tip to remember is avoiding touching the pad surface with oily hands, as this can contaminate them and cause future noise.
Step 3: Check and Replace Hardware
After cleaning, inspect the caliper bolts, clips, and shims for any signs of wear or looseness. Replace any hardware that looks worn out or damaged. Additionally, apply brake grease to the moving parts, but be careful not to get any grease on the pad surfaces themselves.
Step 4: Bed New Pads Properly
If you have installed new pads, you need to perform a proper bed-in procedure. First, drive slowly and apply the brakes lightly several times. After that, gradually increase your braking force. This process helps prevent future squealing and ensures even wear across the pad surface.
Step 5: Test Drive Carefully
Finally, take your car for a test drive in a safe area with little traffic. Listen carefully for any unusual sounds and make sure the brakes stop the car smoothly and effectively. If everything sounds quiet, you have successfully fixed the problem.
Safety Tips to Keep in Mind
Before you start working, always park on a flat, stable surface. Wear gloves and safety glasses to protect yourself from dirt and debris. Never drive with completely worn pads, as this puts you and others at risk. Also, avoid touching the pad surface with greasy hands because contamination leads to noise and reduced performance.
Final Thoughts
Brake noise is a warning sign that should never be ignored. In most cases, the noise comes from worn pads, glazed surfaces, or simple dirt buildup. The good news is that all of these issues can be fixed at home with proper inspection and regular maintenance.
At CarFixedExpert.com, our goal is to make car maintenance simple and practical for everyone. By performing regular brake checks, cleaning components, and inspecting hardware, you can ensure your brakes remain quiet, safe, and reliable for thousands of miles ahead.