How to Wax a Car: Top Complete Guide for Beginners at Home With or Without a Buffer
Learning how to wax a car is one of the best things you can do for your vehicle. A good coat of wax protects your car’s paint from the sun, rain, bird droppings, road dirt, and everything else it faces every single day. It also makes your car look incredibly clean and shiny, and it makes future washes much easier because dirt and water slide right off the surface.
Many car owners skip waxing because they think it is too complicated or too time consuming. The truth is that once you understand the process and have the right products, waxing your car at home is straightforward and even enjoyable. Whether you want to do it by hand, with a buffer, or with a polisher, this guide covers everything you need to know.
All the most common questions people ask about how to wax a car are answered below under clear headings. By the time you finish reading this article you will know exactly what to do, what products to use, and what mistakes to avoid.
What You Need Before You Start Waxing Your Car
Before getting into the step by step process, you need to gather the right supplies. Using the wrong tools is one of the most common reasons people get bad results when waxing a car at home.
Here is what you need for any waxing method whether by hand, with a buffer, or with a polisher.
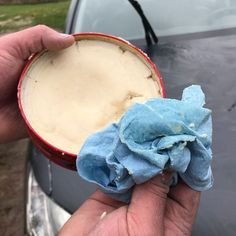
A good quality car wax which can be paste wax, liquid wax, or spray wax depending on your preference. Two or three microfiber applicator pads for applying the wax. Several clean soft microfiber cloths for buffing off the wax. A car wash soap designed for automotive use. Two buckets for washing the car properly. A wash mitt and drying towels. A clay bar kit if the paint feels rough after washing. Blue painter’s tape to protect plastic and rubber trim. A shaded workspace because waxing in direct sunlight causes problems.
The most important thing on this list is the microfiber cloths. Do not use old t-shirts, paper towels, or regular rags. These materials are too rough and will scratch the paint surface. Good quality microfiber cloths are essential for waxing a car properly.
How to Wax a Car for the First Time
If this is your first time waxing a car, do not worry. The process is not as difficult as it looks. Here is a simple step by step guide that any beginner can follow.
Step 1: Wash the Car Thoroughly
The most important rule in waxing is to never wax a dirty car. If you apply wax over dirt, you are sealing the dirt under the wax and you will scratch the paint when you try to buff it off.
Wash the car using the two bucket method. Fill one bucket with soapy water and the other with clean plain water for rinsing your wash mitt. Always wash from the top of the car down to the bottom. This way the dirtiest areas near the wheels and door sills get washed last. Rinse the car completely and dry it with clean microfiber drying towels.
Step 2: Check the Paint Surface
After washing and drying, run your hand gently over the paint. If it feels smooth like glass it is ready for wax. If it feels rough or gritty like sandpaper, there is contamination stuck in the clear coat that washing cannot remove. In that case you need to use a clay bar before waxing.
Using a clay bar is easy. Spray the clay bar lubricant on a small section of the car and gently rub the clay bar back and forth. At first it feels grabby. As it pulls out the contamination it becomes smooth. Keep folding the clay to expose a clean surface and work around the whole car. After clay barring the paint will feel incredibly smooth and it will be ready for wax.
Step 3: Tape Off Plastic and Rubber Trim
Use blue painter’s tape to cover plastic trim, rubber seals, and any badges or emblems. Wax can leave a white chalky residue on plastic trim that is annoying to remove. Taking a few minutes to tape everything off saves a lot of cleaning time later.
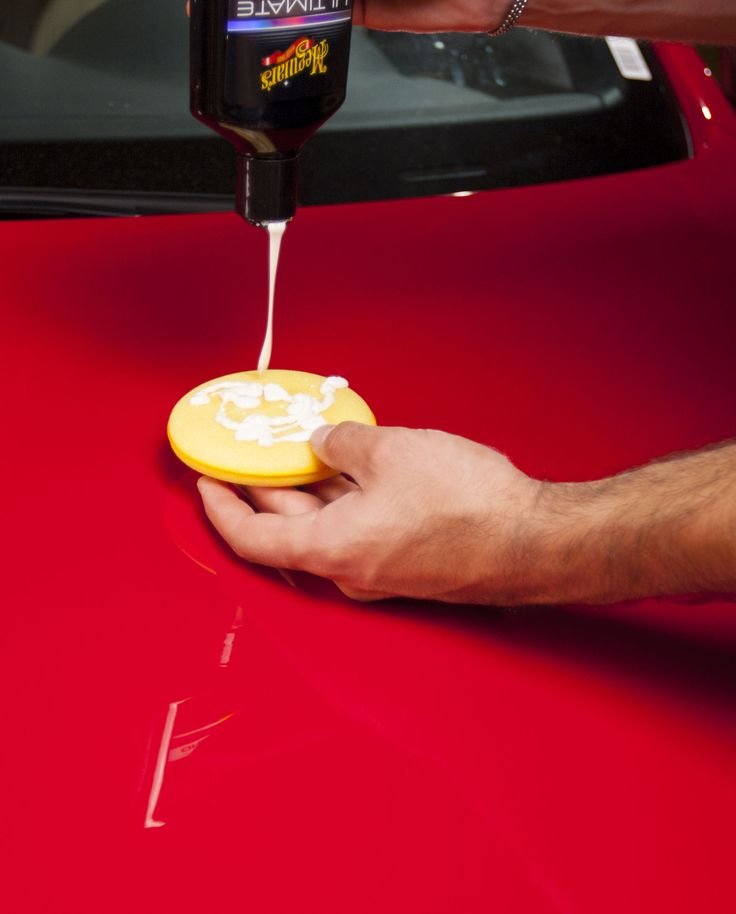
Step 4: Apply the Wax in Small Sections
Work on one small section at a time about two feet by two feet. Apply a small amount of wax to your microfiber applicator pad. You do not need a lot. A thin even layer works much better than a thick one.
Apply the wax using straight back and forth strokes first going vertically and then going horizontally over the same area. This cross pattern ensures complete and even coverage. Work the wax into the surface until you see a thin hazy film form on the paint.
Do not let the wax dry completely hard before moving on to the next step. You want it to reach what is called a haze stage where it looks dull and slightly cloudy but is not rock solid.
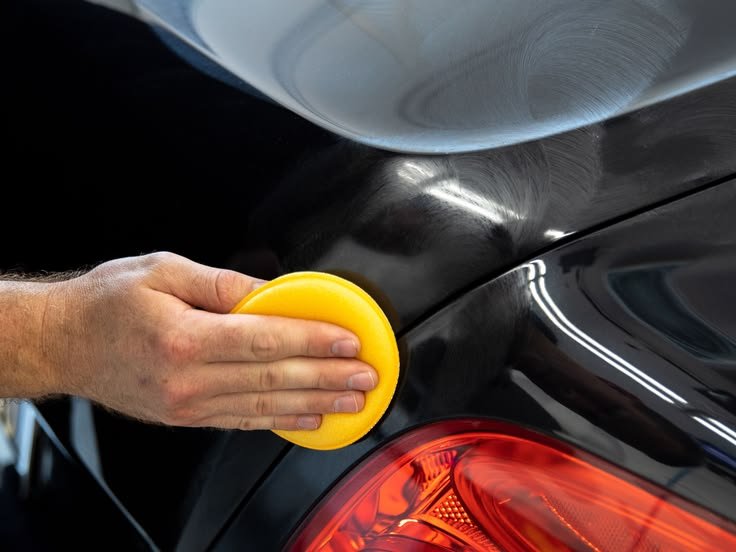
Step 5: Buff Off the Wax
Using a clean dry microfiber cloth, gently buff off the hazy wax. Use light pressure and flip the cloth frequently to expose clean areas of fabric. If you keep using the same dirty section of cloth you are just spreading wax residue around instead of removing it.
Work section by section until the whole car is done. Stand back and look at each panel from different angles to catch any missed spots or streaks. A fresh microfiber cloth and a little extra buffing will fix any problem areas.

How to Wax a Car by Hand
Waxing a car by hand means applying and buffing the wax manually without any electric tools. This is the most accessible method because it requires no special equipment other than applicator pads and microfiber cloths.
Hand waxing works very well for most car owners. It gives you a lot of control and you can feel exactly how much pressure you are applying. The results from hand waxing can be just as good as machine waxing if you use the right technique.
The key to good hand waxing is working in small sections and using thin even layers of wax. Thick uneven layers are much harder to buff off by hand and they do not provide better protection. Thin layers are easier to work with and they look better.
Use a foam or microfiber applicator pad to apply the wax. Do not use your bare fingers as the oils from your skin can interfere with the wax bonding to the paint.
Apply the wax in overlapping strokes to make sure no area is missed. Let it haze and then buff it off with a soft microfiber cloth. The whole process takes about two to three hours for an average sized car when done by hand.
Paste wax is the best type for hand application because it is easier to control and it gives a very deep warm shine. Liquid wax is also good for hand application and is slightly easier to spread and buff off.
How to Wax a Car Without a Buffer
Many people ask how to wax a car without a buffer because they do not own a machine polisher and do not want to buy one. The good news is that you absolutely do not need a buffer to wax a car well.
Waxing without a buffer is simply hand waxing. All the steps described above in the hand waxing section apply here. You apply the wax with an applicator pad and buff it off with a microfiber cloth by hand.
The only situation where a buffer becomes very helpful is when you are doing paint correction to remove swirl marks and scratches. For simply applying and buffing off wax, hand application works perfectly fine.
If you want to make hand buffing easier on larger panels, you can use a microfiber bonnet that wraps around a foam block. This gives you a larger buffing surface and reduces the effort needed to remove the wax.
One tip for waxing without a buffer is to apply the wax in the evening or in a cool shaded area. This slows down the curing time and gives you more working time before the wax hazes up. This makes it easier to work through larger sections without rushing.
How to Wax a Car With a Buffer at Home
A buffer makes the waxing process faster and more consistent. If you want to learn how to wax a car with a buffer at home, here is what you need to know.
A dual action orbital buffer is the best type for home use. It is safe for beginners because it moves in a random orbital pattern that reduces the risk of burning through the paint. Avoid rotary buffers unless you have experience because they generate a lot of heat and can damage the clear coat if used incorrectly.
To wax a car with a buffer at home, attach a soft foam finishing pad or a microfiber applicator pad to the buffer. Apply four to five drops of liquid wax directly to the pad. Spread the wax at low speed first to avoid flinging product everywhere. Then increase the speed and work the wax into the paint using slow overlapping passes.
Work in sections of two feet by two feet just like hand waxing. Keep the buffer moving at all times. Never stop the buffer in one spot while it is running because the concentrated movement can generate heat and damage the paint.
Once the wax has hazed up, turn off the buffer and wipe off the residue with a clean microfiber cloth. The buffer helps you apply the wax evenly and can cut your working time in half compared to hand application.
Car Paint Correction: Top Guide to Fix Swirl Marks and Use a Correction Paint Pen
How to Wax a Car With a Polisher
Many people use the terms buffer and polisher interchangeably but they can mean slightly different things. A polisher is often used for paint correction with cutting compounds while a buffer is used for applying wax and sealant.
However if you have a dual action polisher you can absolutely use it for waxing too. The process is exactly the same as described in the buffer section above. Just make sure you are using a soft finishing pad and a wax product rather than a cutting compound.
When using a polisher for waxing, use a lower speed setting than you would for paint correction. Wax does not need aggressive action. A gentle speed of two to three on a six speed machine is enough to spread and work in the wax evenly.
Using a polisher for waxing gives you very consistent and even coverage across large panels. This is especially useful on hoods, roofs, and trunk lids where covering the whole area evenly by hand can be tiring.
After applying the wax with the polisher, always do the final buff with a clean microfiber cloth by hand. This removes any remaining residue and brings out the final shine.
How to Wax a Car at Home
Waxing a car at home is completely achievable even if you have never done it before. You do not need a professional detailing setup or expensive equipment. Here is a summary of the best approach for waxing at home.
Choose a shaded spot like a garage, a carport, or the shaded side of your house. Never wax in direct sunlight. Heat makes the wax dry too fast and it becomes very hard to buff off cleanly.
Start with a thorough wash and clay bar if needed. Make sure the paint is completely clean and smooth before applying any wax.
Choose a liquid wax if you are a beginner. Liquid wax is easier to apply and remove than paste wax and it works great for home use. Spray wax is the easiest of all but it does not last as long.
Work in small sections, apply thin layers, and buff off completely before moving to the next section. Take your time and do not rush.
When you are done, remove all the painter’s tape and clean any wax residue from plastic trim or rubber seals with a soft detailing brush or a clean cloth.
Stand back and admire the result. A freshly waxed car at home looks just as good as one done by a professional if you follow the right steps.
How to Wax a Car Reddit Tips and Advice
Reddit car detailing communities are full of useful tips from real car owners who have learned through experience. Here are some of the most commonly recommended tips from these communities.
The most repeated advice is to always work in the shade and never wax a hot car. This comes up in almost every waxing discussion because it makes such a big difference.
Many Reddit users recommend doing a clay bar treatment before waxing, especially if the car has not been waxed in a long time. They say the difference in smoothness and shine is noticeable.
A common tip is to use less wax than you think you need. Thin layers apply easier, cure properly, and buff off cleanly. Thick layers just create more work and do not look better.
Many experienced detailers on Reddit recommend using a spray wax or quick detailer after every wash to maintain the protection between full waxing sessions. This keeps the paint looking fresh and extends the life of the wax.
One tip that many beginners overlook is checking your work under a bright light or in direct sunlight after buffing. This reveals any streaks, missed spots, or hazy areas that are not visible in dim light.
Reddit users also widely agree that microfiber cloths are non negotiable. Many beginners damage their paint by using the wrong cloths and this is something that comes up repeatedly in beginner questions.
How Often Should You Wax Your Car
How often you wax depends on where you park and what type of wax you use.
If you park outside in the sun or in a climate with harsh weather, you should wax every two to three months. If you park in a garage and the climate is mild, every three to four months is enough.
You can test whether your car needs waxing by spraying a little water on the hood. If the water beads up into round droplets and rolls off easily, the wax is still working. If the water spreads flat and does not bead, the protection is gone and it is time to wax again.
Spray waxes and quick detailers need to be applied more frequently because they do not last as long as paste or liquid wax. Some spray coatings and ceramic spray waxes can last six months or more with proper care.
Common Waxing Mistakes to Avoid
Here are the most common mistakes people make when waxing a car and how to avoid them.
Waxing in direct sunlight causes the wax to dry too fast and become very difficult to remove. Always work in the shade.
Using too much wax does not mean more protection. It just creates extra work and can leave streaks. Use small amounts and work in thin layers.
Skipping the wash step and applying wax over a dirty car scratches the paint when you buff. Always start with a clean car.
Using dirty or rough cloths introduces scratches right after you have finished waxing. Use fresh clean microfiber cloths only.
Letting the wax harden completely before buffing makes it much harder to remove. Buff it off when it reaches the haze stage, not when it is rock solid.
Waxing over rough contaminated paint gives poor results. Always clay bar the surface if the paint feels rough after washing.
Conclusion
Learning how to wax a car at home is a skill that pays off every time you look at your car. Whether you wax by hand, with a buffer, or with a polisher, the result is the same. A clean, smooth, protected paint surface that looks great and stays cleaner for longer.
The process is not complicated. Wash the car thoroughly, clay bar if needed, apply wax in thin sections, and buff it off with clean microfiber cloths. Work in the shade, use the right products, and take your time.
Once you do it the first time and see that deep glossy shine you will understand why so many car owners make waxing a regular part of their car care routine. Your paint will thank you for it and your car will look better than it has in years.

Adnan Aslam is passionate about helping everyday drivers understand their vehicles better. Through CarFixedExpert.com, he shares clear, step-by-step car maintenance guides written in simple language. His goal is to make basic repairs and maintenance easy, safe, and affordable for everyone.
He believes that even small car knowledge can save money and prevent major problems. His content focuses on practical advice, safety awareness, and beginner-friendly explanations.